Tuesday, 18 February 2014

Custom Built Oracle/Hyperion Essbase ASO Aggregate Views

Query performance of large (billions of cells) Essbase ASO cubes is dependent on selecting proper aggregate views. The ideal is that most user queries hit a subset of the database (an aggregate view or a small slice of bottom level data) and not the entire database. This will result in fast queries and happy users.

This article explains how improve the query performance of ASO cubes by building custom aggregate views and provides a way of manually generating the aggregate view ID’s and view file.

Building aggregate views is a two-step process:

  1. Aggregate Selection -> selection of the aggregate views to be built
    Selecting aggregate views can be done in two ways:
    • “execute aggregate selection” maxl command which select the “best” aggregate views by analysing the cube data together with outline hints and captured user queries. MaxL statement “execute aggregate process” does the same thing as the aggregate selection only with fewer options. 
    • or if you know your dimensions, your data and the user queries you can build the aggregate views manually and save them to file. This article will focus on this task.

    For big databases already having an aggregate selection and not executing it every time saves a lot of time and allows for reduced maintenance windows.
    Aggregate view selection is single threaded while aggregate build is multi-threaded. This means that aggregate build can benefit from more cpu’s (Exalytics) while aggregate selection does not.
     
  1. Aggregate Build -> based on the selection step it builds/materialises aggregate views.
    It receives as inputs either a set of aggregate view id’s or a file with aggregate views.
    Performance of this step is mostly dependent on CALCPARALLEL settings, hardware, temp/default tablespace settings (cube outline and data of course).
    The aggregate build process can benefit from multiple CPU’s for the most part. Some parts of the aggregate build like the commit from the Temp tablespace to the Default tablespace are single threaded which is not great
Essbase aggregate selection process based on automatic data analysis and outline hints:
  • for small databases it’s perfect. Sometimes aggregate views are not even needed.
  • The default sample size to determine and estimate the size of aggregate views is 1,000,000 cells. This is fine for small cubes but needs to be adjusted for larger cubes using the Essbase CFG setting ASOSAMPLESIZEPERCENT. Increasing the value of this setting means more data will be analysed when determining what aggregate views meet selection criteria consequently the view selection and the size estimate is better.
  • for bigger databases with big data and big dimensionality the selection is not as good. Not as good can quickly become unusable. Essbase cannot possibly know what queries will be running. For example it cannot know that the Period dimension will be always/mostly be used as level 0 so aggregate views might select upper level on Period which makes those views useless (this is just an example as you can use Dynamic dimensions or outline hints).
  • It can take a long time (1-2 hrs) on big databases with big sample size (even when using an Exalytics box) and does not necessary provide the best aggregate views.
Essbase aggregate selection process based on captured user queries:
  • Allows the selection of ‘better’ aggregate views. Always a good idea. 
  • When a cube first goes live there is no user query data. The cube needs to be usable for the users to start generating query data. Some people have implemented scripts that execute MDX queries or do Essbase retrieves so that when the Aggregate Selection process runs Essbase will identify specific views. This works but it would be a lot easier the actually specify what views you want to aggregate.
Manual selection of Essbase aggregate views:
  • Allow the selection of those aggregate views which are specifically meant to maximise query performance and get the best possible user experience
  • Understating the dimensions, data, user queries and how user queries are affected by aggregate views is needed. This probably requires more in-depth knowledge and more development time then the automatic aggregate selection however the results can be from unusable cube to sub second reporting (or not, depends on the developer). 
  • Changes in dimension levels invalidate the aggregate views so they need to be recalculated. This process can be automated if needed.
To manually create aggregate views follow the steps:
  1. Get the outline ID of the cube
    Run Maxl command “execute aggregate selection on database ASOsamp.Sample selecting 1 views force_dump to view_file 'VF_FILE1';”
    The outline for ASOSamp ID is “4142187940”. 
  2. Get dimension levels of the cube
    Run Maxl command “query database ASOsamp.Sample list aso_level_info;” 
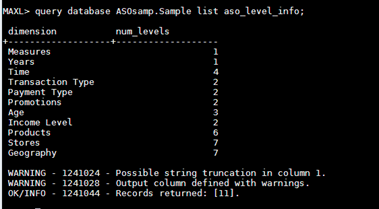
  3. Go to http://aggregateviewbuilder.azurewebsites.net and input the outline id and dimensions levels.
    The inputs have been already set to use example ASOSamp application that ships with Hyperion however they can be changed to any database. 
  4. Build custom Aggregate View Input the aggregate view in the right side of the screen as follows:
    • An aggregate view is list of levels and each level corresponds to a dimension in the outline. 
    • One line represents an aggregate view
    • Each view is made up of comma separated levels. These levels will identify a specific slice in the database that will be aggregated.
    • Levels start from 0 and to a maximum of (Dimenion levels -1). So if the Time dimension has 4 levels then the aggregate view level can only have 0,1,2 or 3.
    • The image below shows all dimensions and levels in the ASOSamp applications and 5 aggregate views: 

  5. Generate aggregate view file and place it on the Essbase server in the ASOsamp.Sample folder.
    Press the “Generate Aggregate View File” and copy the contents of the bottom text box to a file called “VF_FILE1.csc”.
    Copy this file to the database folder (X:\Oracle\Middleware\user_projects\epmsystem1\EssbaseServer\essbaseserver1\app\ASOsamp\Sample). 
  6. Run aggregate build
    MaxL to run aggregate build:
    execute aggregate build on database ASOsamp.Sample using view_file 'VF_FILE1';

  7. Check the size of the aggregate views and the performance of the cube.
    Maxl to check aggregates:
    set column_width 50;
    query database ASOsamp.Sample list existing_views;   

Monday, 1 July 2013

Adding prior/previous year to Hyperion Planning

Adding a prior or previous year to an already built Hyperion Planning application is a fairly common requirement. The 'supported path' to add prior years is to build a new application that starts with the desired financial year and then to use LCM to move all artefacts from the old application to the new application. Following this path might take a long time so below is a quick fix.
Requirement:
Add FY03 to a planning application that starts from FY04 and goes to FY05.
Quick fix:
1. Do a backup of the planning backend database
2. Add FY06 in the planning front end.
3. Stop the planning service.
4. Make changes to the planning repository
  a. Update the calendar so it starts from 2003
     UPDATE HSP_CALENDAR SET FIRST_YEAR = '2003'
  b. Rename all year member FY(XX) to FY(XX-1)
     UPDATE HSP_OBJECT  SET OBJECT_NAME = 'FY03' WHERE OBJECT_NAME = 'FY04';
     UPDATE HSP_OBJECT  SET OBJECT_NAME = 'FY04' WHERE OBJECT_NAME = 'FY05';
     UPDATE HSP_OBJECT  SET OBJECT_NAME = 'FY05' WHERE OBJECT_NAME = 'FY06';
  c. Update the unique values to avoid error "An object with the name already exists" when adding a new year
     UPDATE HSP_UNIQUE_NAMES  SET OBJECT_NAME = 'FY03' WHERE OBJECT_NAME = 'FY04';
     UPDATE HSP_UNIQUE_NAMES  SET OBJECT_NAME = 'FY04' WHERE OBJECT_NAME = 'FY05';
     UPDATE HSP_UNIQUE_NAMES  SET OBJECT_NAME = 'FY05' WHERE OBJECT_NAME = 'FY06';
5. Start the planning service.
6. Verify that everything shows up as expected and do a database refresh. Maybe add 1 year to the planning app to check that everything is ok.

Friday, 23 March 2012

Hyperion Essbase & Planning Drill-Through

Drill-Through from an Essbase cube or a Planning application is a fairly common requirement. There are a couple of ways to do it: EIS, Essbase Studio, FDM, etc. The main drawback of most (probably all) of these tools is that the cube/application needs to be built from the ground up using one of these tools. There are a couple more drawbacks in some of the tools like upper level drill-through, retrieval speed and format of the returned data so there is some kind of compromise that has to be made. Business users do not necessarily see eye to eye with the consultants or hyp-admins when it comes to compromises.
Drill-through can also be done in reporting products like Web Analysis and OBIEE however the link between users and Excel cannot be broken easily.

Drill-Through from Hyperion Planning applications to transaction data is especially important if you do not want to transform you're planning application into an detailed actual reporting application. Also an audit will usually result in the requirement that transaction data should be made available.

Making a BSO cube include detailed actuals is not always the best of ideas however it is fairly common practice. Mainly because a Planning Plus licence doesn't allow the use of ASO cubes, getting the ASO option does not allow the use of Financial Reporting with ASO, getting both ASO+FR might be too expensive. Mixing a BSO forecast/budget with and ASO reporting cube is a really good idea and will(should) result in good performance.

One good way to get drill-through from a Planning app or an Essbase cube is to use the drill-through definition provided by Essbase. There is not a lot of documentation about this that I could find. Also some of the examples that I could find do not work. See Oracle Essbase Addendum.
The Essbase drill-through definition allows to add drill-through capabilities to any cube or Planning application without having to modify the existing ETL or sending users to web reports. I think that is also easy and fast to implement.

The Essbase drill-through definition can be used together with a simple custom made web app to allow drill-through from Excel/SmartView or Planning Forms. The result of the drill-through can be anything, a list of transactions based on the POV delivered as html, xls, pdf, cvs, avi or a parametrised redirect to something like an OBIEE report.

Once the Essbase drill-through definition is created the drill-through is available in Excel (Smart View) or Planning forms and looks like this:
Once the user clicks the drill-through button the default browser will be opened and a post request will be made to the URL specified in the drill-through definition. A CSV file or whatever the users like will be returned.
The drill-through can be initiated from Excel / Smart View using either the "Drill-through" button located on the ribbon or by right clicking  on the data cell and selecting "Smart View -> Drill-through".
Two or more drill-through definition can be specified for the same data cell and the users will have to choose which one wants to execute.

To create a drill through definition MaxL, Admin Services Console or the Essbase API (Essbase C API as I couldn't find this in the Java API) can be used. MaxL is the easiest option to show an example in:

1. Create the drill-through definition's XML file, name it "xml.xml" and save it on the C drive:

<?xml version="1.0" encoding="UTF-8"?>
<foldercontents path="/">
  <resource name="Show transactions" description="" type="application/x-hyperion-applicationbuilder-report">
    <attribute name="name" type="string" xml:lang="es" value="Drill through" />
    <action name="Display HTML" description="Launch HTML display of Content" shortdesc="HTML">
      <url>
        <![CDATA[http://webserver/page.html?context=$CONTEXT$&$ATTR(ds,id,pos,gen,level.edge)$]]>
      </url>
    </action>
  </resource>
</foldercontents>

2. Create the drill-through  definition in Essbase with MaxL:

create drillthrough sample.basic."Show transactions" from xml_file 'C:\xml.xml' on {'@DESCENDANTS("Measures"), "100", "200", "300"'};

Done. All users that have access to those particular members will see the drill-through. Note that SSO_TOKEN parameters can also be used in the URL specified in the XML file so that the users credentials can be verified.

The Essbase API can be used to manage drill-through definitions. In a custom build app this might be the way to go.

When a user selects the drill-through the default web browser is opened and a POST request is sent to the URL defined in the drill-through definition. The web application receiving the request is responsible for parsing the request and doing something about it. The request will contain all the info that the users sees on the screen: all selected members (POV) at any level, the level of the members, where is the drill through coming from, server name, app name and sso token.

Here is an example of the Post request coming from Essbase:
context=$CONTEXT$&attribute=Market.id.New+York&attribute=Scenario.id.Actual&attribute=Measures.id.Marketing&attribute=Product.id.100&attribute=Year.id.Jan&attribute=Market.edge.col&attribute=Market.pos.0&attribute=Market.level.0&attribute=Market.gen.3&attribute=Scenario.edge.col&attribute=Scenario.pos.1&attribute=Scenario.level.0&attribute=Scenario.gen.2&attribute=Measures.edge.col&attribute=Measures.pos.2&attribute=Measures.level.0&attribute=Measures.gen.4&attribute=Product.edge.row&attribute=Product.pos.0&attribute=Product.level.1&attribute=Product.gen.2&attribute=Year.edge.row&attribute=Year.pos.1&attribute=Year.level.0&attribute=Year.gen.3&attribute=system.ds.essbase&attribute=server.ds.demoepm1112&attribute=app.ds.Sample&attribute=database.ds.Basic&attribute=alias.ds.Default&applicationtype=officeAddin

An easy way to see how the request from Essbase looks like is to put http://www.hashemian.com/tools/form-post-tester.php/drillthroughtest as the URL in the drill -through definition. This page will show the POST data sent by Essbase.

The most common requirements is to show the user a list of transactions in CSV format based on the members available on the users Excel spread sheet or the members on the Planning form.
A common flow will look like this:
- the request coming from Essbase is parsed to get the Dimenion/Member selected by the user and the sso token.
- the sso token is validated. The css api, essbase api or a direct http request to the workspace web page (this is not officially supported) can be used to validate the sso token.
- decide what members will be used in the SQL query that will get the transaction data. If an upper level member is selected by the user and transaction data sits at bottom level then the level 0 descendants will be needed. To get this info the Essbase outline can be queried or any other data source that contains this info (planning db)
- build the select statement or call an stored procedure to get transactions out of the dw
- format the transaction data as CSV and send it to the user. The web page that was opened by the drill- through will be automatically closed and the CSV file will be opened in Excel.

The above can be done in ASP, JSP, PHP and any web developer will be able to do it. Because the request is received by web app that is completely under the developers controls the outcome of the drill-through could be virtually anything:
- a file with anything in it: transactions, changes/merges over time for a particular business unit, sections, debtor
- a redirect to OBIEE, E-Business Suite
- an e-mail to an user saying this value needs attention.
- a trigger to an ETL process to start refreshing data for a particular entity

Friday, 17 February 2012

Essbase C API with C# - Login & Database List

After the Essbase C API has been initialised successfully a pointer to an essbase api instance handle is returned. The instance handle should be preserved as it will be needed throughout the program. If building a wrapper in C# the instance handle should be kept. The instance handle will be used in function like EssTerm, EssAlloc, EssLogin, EssFree and so on.
As initialising the Essbase API is discussed in another post I won't show it here however it is needed.

Here are the steps to login to essbase and get the accessible list of databases of the logged-in user:

Prerequisites
1. Add a few constants

public class NativeConstants
{
    public const int ESS_DBNAMELEN_CHARACTER = 30;
    public const int ESS_BYTES_PER_CHARACTER = 4;
    public const int ESS_BYTES_FOR_TRAILING_NULL = 5;

    public const int ESS_APPNAMELEN = ((30 * NativeConstants.ESS_BYTES_PER_CHARACTER) + NativeConstants.ESS_BYTES_FOR_TRAILING_NULL);
    public const int ESS_DBNAMELEN = ((NativeConstants.ESS_DBNAMELEN_CHARACTER * NativeConstants.ESS_BYTES_PER_CHARACTER)+ NativeConstants.ESS_BYTES_FOR_TRAILING_NULL);
}

2. Create the ESS_APPDB_T structure. This is needed to get the accessible list of database in case of a successful login.

[StructLayout(LayoutKind.Sequential, Pack = 1)]
public class ESS_APPDB_T
{
    /// <summary>
    /// Application name
    /// </summary>
    [MarshalAs(UnmanagedType.ByValTStr, SizeConst = NativeConstants.ESS_APPNAMELEN)]
    public string AppName;

    /// <summary>
    /// Database name
    /// </summary>
    [MarshalAs(UnmanagedType.ByValTStr, SizeConst = NativeConstants.ESS_DBNAMELEN)]
    public string DbName;
}

3. Add more functions to the EssbaseTypes class

public class EssbaseTypes
{
[DllImport("essapinu.dll", CharSet = CharSet.Ansi, SetLastError = true, ExactSpelling = true)]
static internal extern uint EssInit(ref ESS_INIT_T EssInitStruct, ref uint EssHInst);

[DllImport("essapinu.dll", CharSet = CharSet.Ansi, SetLastError = true, ExactSpelling = true)]
static internal extern uint EssTerm(uint EssHInst);

[DllImport("essapinu.dll", CharSet = CharSet.Ansi, SetLastError = true, ExactSpelling = true)]
static internal extern uint EssLogin(uint EssHInst, string EssSvrName, string EssUserName, string EssPassword, ref ushort EssDBCount, ref IntPtr EssDBList, ref uint EssHCtx);

[DllImport("essapinu.dll", CharSet = CharSet.Ansi, SetLastError = true, ExactSpelling = true)]
static internal extern uint EssLogout(uint EssHCtx);

[DllImport("essapinu.dll", CharSet = CharSet.Ansi, SetLastError = true, ExactSpelling = true)]
static internal extern uint EssFree(uint EssHInst, IntPtr EssMemBlock);
}

Code
1. Initialise the Essbase API and get the instance handle. How to initialise the Essbase C API
2. Call the login function

Here are a few functions that can be used:
EssLogin - login with db list
EssAutoLogin - login with EssSetActive added to it
EssLoginEx - login with sso_token. Really useful when the token is passed from another Hyperion product as it eliminates the need to ask for credentials.

We'll use EssLogin as it is a bit more interesting.

info needed:
- user and password: "admin"/"password" is my favourite as most production env are using it.
- Essbase server: Can be either server:port or the url of the essbase cluster. If only the server name is used then the default port is used.

info returned:
- essDBCount: the number or accessible database
- essDBList: a pointer to array of ESS_APPDB_T structures
- essHCtx: context handle. Should be kept because it will be needed in almost all api calls.

// Connection details
string essServer = "server";
string username = "admin";
string password = "password";

// Out values of EssLogin method
ushort essDBCount = 0;
IntPtr essDBList = new IntPtr();
uint essHCtx = 0;

// essHCtx is to be user in subsequent essbase api calls
uint errNum2 = EssbaseTypes.EssLogin(essHInst, essServer, username, password, ref essDBCount, ref essDBList, ref essHCtx);

3. Get the list of accessible databases
What we get back from EssLogin is the number of databases and the a pointer to a list of databases

if (essDBCount > 0)
{
    // Get the database list
    ESS_APPDB_T[] appdbs = new ESS_APPDB_T[essDBCount];
    for (int i = 0; i < essDBCount; i++)
    {
        appdbs[i] = (ESS_APPDB_T)Marshal.PtrToStructure(new IntPtr((essDBList.ToInt32() + i * Marshal.SizeOf(typeof(ESS_APPDB_T)))), typeof(ESS_APPDB_T));
    }
}

4. Free memory


// Free memory allocated to the app/db list
uint errNum3 = EssbaseTypes.EssFree(essHInst, essDBList);

5. Logout

// Log out
uint errNum4 = EssbaseTypes.EssLogout(essHCtx);

6. Terminate the API

// Terminate
uint errNum5 = EssbaseTypes.EssTerm(essHInst);

The C# code above is only an example on how to use the Essbase C API. Building a proper C# wrapper requires a bit more work, especially around UTF8 compatibility.
One very important aspect of using the essbase api is freeing memory. Memory leaks can sneak in and slowly kill you application.

To get the Essbase C API working the API version in the ESS_INIT_T should be set to something like 0x00070000 otherwise it will create problems later on. I do not know exactly why this is happening but some people have been know to spend days figuring this thing out.


Monday, 6 February 2012

Using the Essbase C API with C# - Initialisation

Essbase C API and .Net does not appear to be the hottest topic on the net, probably for obvious reasons, but somebody might find this useful. Working with the Essbase C API is fairly intuitive (after a while) and if imagination helps great products can come out.

Here are the steps to get the Essbase C API working in C# :
1.Install the Essbase Client and set the ESSBASE_PATH environment variable to “X:\Oracle\Middleware\EPMSystem11R1\products\Essbase\EssbaseClient”
2.Alternatively copy the Essbase API to a folder and set the ESSBASE_PATH to point to that folder. This makes for an easier deployment.
3.Create a new project in VS and add the following classes:

public class EssbaseTypes
{
[DllImport("essapinu.dll", CharSet = CharSet.Ansi, SetLastError = true, ExactSpelling = true)]
static internal extern uint EssInit(ref ESS_INIT_T EssInitStruct, ref uint EssHInst);

[DllImport("essapinu.dll", CharSet = CharSet.Ansi, SetLastError = true, ExactSpelling = true)]
static internal extern uint EssTerm(uint EssHInst);
}

public delegate uint FcnPtr();

[StructLayout(LayoutKind.Sequential, Pack = 1)]
public struct ESS_INIT_T
{
   public uint Version;
   public uint UserContext;
   public ushort MaxHandles;
   public uint MaxBuffer;
   public string LocalPath;
   public string MessageFile;
   public FcnPtr AllocFunc;
   public FcnPtr ReallocFunc;
   public FcnPtr FreeFunc;
   public FcnPtr MessageFunc;
   public string HelpFile;
   public uint Ess_System;
   public uint usApiType;
}


4.Using the code:

string essApiPath = @"C:\Oracle\Middleware\EPMSystem11R1\products\Essbase\EssbaseClient\bin\";
           
// Create initialisation structure
ESS_INIT_T essInit = new ESS_INIT_T();
essInit.Version = 0x000B1200;
essInit.UserContext = 0;
essInit.MaxHandles = 0;
essInit.MaxBuffer = 0;
essInit.LocalPath = essApiPath;
essInit.MessageFile = essApiPath + "essbase.mdb";
essInit.AllocFunc = null;
essInit.ReallocFunc = null;
essInit.FreeFunc = null;
essInit.MessageFunc = null;
essInit.HelpFile = essApiPath + "essapiw.hlp";
essInit.Ess_System = 0;
essInit.usApiType = 0x0002;

// instance handle
uint essHInst = 0;

// The errNum is 0 when successful
uint errNum1 = EssbaseTypes.EssInit(ref essInit, ref essHInst);
if (errNum1 == 0)
{
// Code goes here

uint errNum2 = EssbaseTypes.EssTerm(essHInst);
}

5. The errNum should be 0 in case of a successful initialisation. Any other code indicates an error. Errors are usually related to the essbase api path and the ESSBASE_PATH variable.

The value for Version in ESS_INIT_T can be found in file essapi.h. For 11.1.2 the version is 0x000B1200.